HOW TO MAKE DIY 3D PRINTABLE STARS.
/Print and make your very own 3D Paper Christmas Star with this free template. You can use any colour paper to match your theme which makes them the perfect DIY holiday decoration.
3D Paper Star Template.
Let’s get crafty this holiday season with a simple and modern Christmas decoration, DIY 3D Printable Stars. I love a good DIY Christmas Star craft. They look fantastic hanging on the tree or propped up on the fireplace. And they couldn’t be easier to make with my free template ready for you to download.
You can make them 3D by glueing the two halves together, great for hanging on the tree or using as a tree topper. For a single-sided star that you’ll only see from one side, cut off the tabs and fold. Punch a hole in the top and string them onto some bakers twine for a pretty garland.
Print the blank template onto the back of your favourite patterned paper or cardstock and coordinate to match your colour scheme. I’ve made them in two sizes, a bigger one that makes the perfect star to pop on the top of your tree or a smaller one that you can hang from the branches.
There are so many things you could do with these 3D stars. They make fantastic holiday decorations. You can prop them up on the fireplace or attach some ribbon and hang from the walls or doors. They can even be filled with a small gift and used as gift boxes.
Materials:
Free Large Printable Star Template / Free Small Printable Star Template (scroll down for the templates).
Scissors
Glue or Double-sided Tape
This page contains some affiliate links. This means that if you make a purchase after clicking a link I earn a small commission but it doesn’t cost you a penny extra!
How to make a DIY 3D Christmas Star - with free printable template.
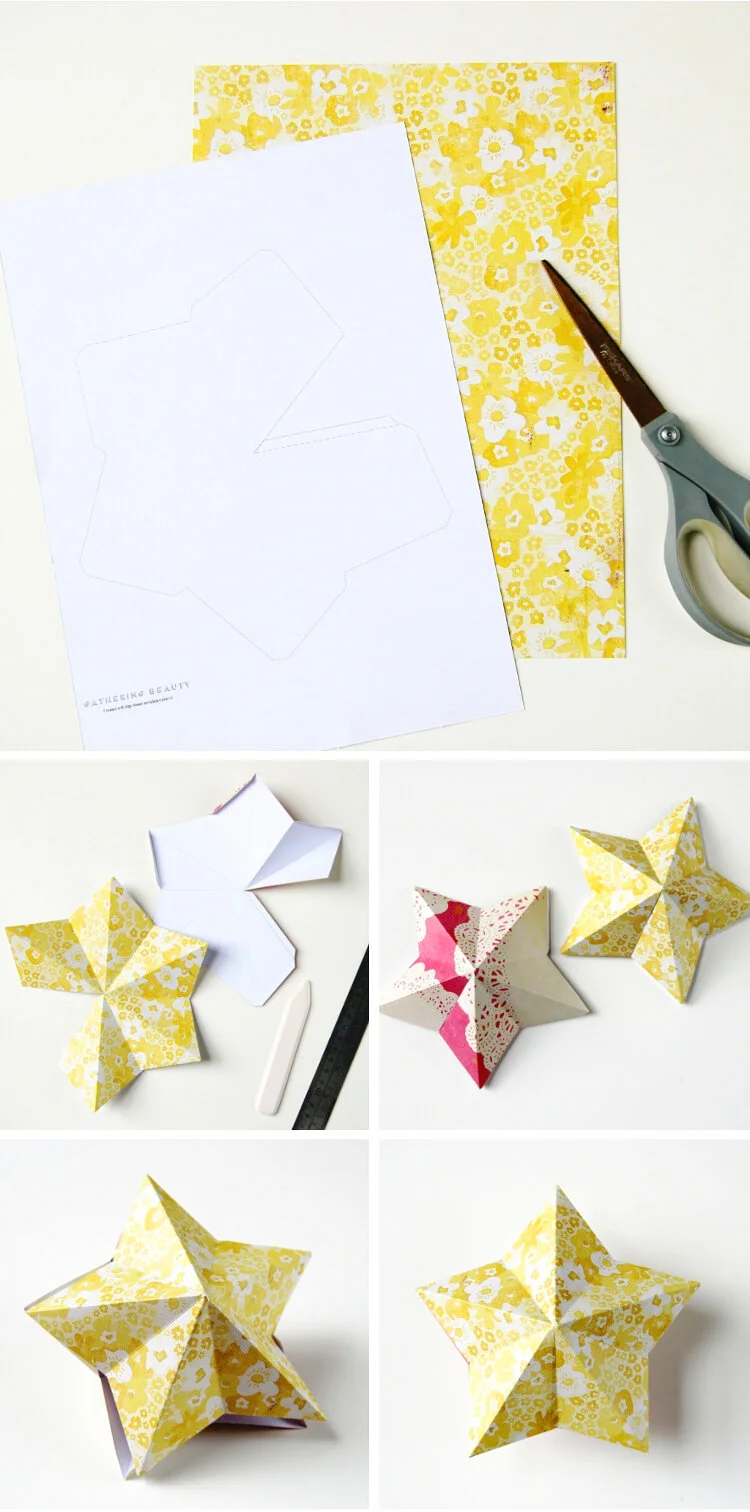
Download and print out the template onto the back of your chosen scrapbook paper. You'll need to print the template out twice, once for the front of your star and once for the back.
Cut the template out. Use a bone folder or an embossing tool and a ruler and score along the dashed lines.
Fold along the score lines. Fold the blue dashed lines as mountain folds and the green dotted lines as valley folds to make the star shape.
For a single-sided star cut off the tabs and punch a hole through the top to hang.
To make a 3D star, stick double-sided tape or glue to the tabs and stick the 2 halves of the star together.
This last step can be a little fiddly so some patience is required but stick with it as I promise they’re worth the effort.
I cut a small hold in the bottom of mine and used it as a tree topper. It looks really cute on top of the tree. What would you use some of these 3D stars for? I'd love to know.
More Easy DIY Christmas Stars:
When you’re done making these and you’re looking for more Christmas crafts, try one of these other simple DIY Christmas tutorials.


