HOW TO MAKE DIY HONEYCOMB BALLS.

HOW TO MAKE DIY HONEYCOMB BALLS.

Want to know how to make tissue paper honeycomb balls? They’re super cheap, easy to make and can be made to match any colour theme.

The perfect decorations for a birthday party or wedding or well, just about occasion really. Having a summer bbq? Hang them from a tree or fence. Indoor party? Cover a wall and make a cool photo backdrop. Perfect.

Follow these simple instructions and learn how to make your own.

Read More

DIY ORIGAMI BOX ADVENT CALENDAR.

DIY ORIGAMI BOX ADVENT CALENDAR.

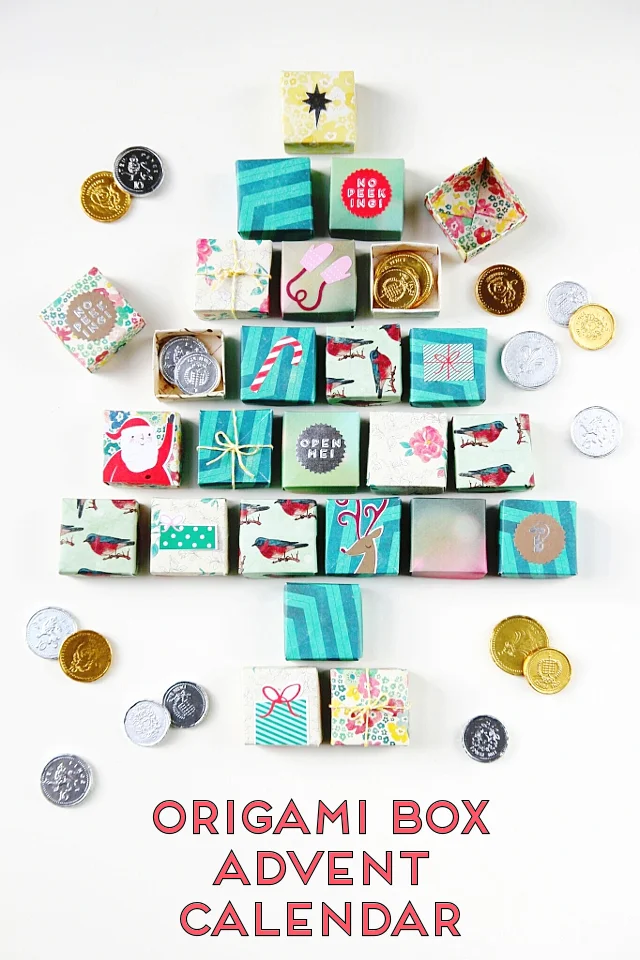
It's that time of year again. Time to start thinking about counting down to Christmas and what better way is there to countdown than with this DIY origami box advent calendar.

Normally I end up with one of those store-bought chocolate filled calendars but last year my Mum made me one complete with glittery snow scene. I loved having a homemade advent calendar so this year I decided to step up my game and make one as well.

And make sure to check out the rest of my Christmas Origami projects.

DIY ORIGAMI BOX ADVENT CALENDAR.

Do you remember my easy origami gift boxes? Well, I decided smaller versions would be perfect for holding some chocolate coins.

Each finished box measures 2x2 inches square and is 1 inch high so if you don't want to use chocolate coins they're still big enough to hold a small gift or treat. To make each box you need a piece of paper measuring 6x6 inches for the lid and a piece measuring 5.5x.5.5 inches for the base. If you're using scrapbook paper like I did you can get 2 out of each 12x12 piece with only minimal waste. I used the American Crafts Maggie Holmes 12 x 12 Paper Pad.

You can find a full tutorial for how I made the origami boxes here.

DIY ORIGAMI BOX ADVENT CALENDAR.

I filled each box with a couple of chocolate coins and decorated them using stickers and bakers twine.

DIY ORIGAMI BOX ADVENT CALENDAR.

I didn't have any number stickers so I wrote the numbers 1-24 on the bottom of the origami boxes using a gold gel pen.

DIY ORIGAMI BOX ADVENT CALENDAR.

Once decorated all you need to do is arrange the boxes in a Christmas tree shape. I used yellow patterned paper with a silver star sticker for the tree topper. You can leave your boxes as they are but if you're short on space you can glue the back of each box to a piece of card so you can stand your advent up instead.

Make sure to check my other Christmas crafts and recipes for more diys.

DIY ORIGAMI BOX ADVENT CALENDAR.
Comment

Emma

Hi, I'm Emma.

I'm a crafter, blogger and paper enthusiast living in the North West of England.

Gathering Beauty is the place where I share craft tutorials and diy inspiration. I started this blog back in 2013 as a way of sharing all the things I love and make. I share paper crafts, clay crafts, origami, printables and desktop wallpapers as well as the odd crochet and weaving project. I hope you find something here that inspires you.

Origami Rectangle Box - All-In-One

Origami Rectangle Box - All-In-One

Are you planning on giving a handmade gift but don’t have a box for it? Learn how to make these clever all-in-one rectangular origami boxes using a single sheet of paper. The ideal handmade gift box for your best friend, mother or that special someone.

Read More

DIY ENVELOPE LINERS.

Diy Envelope Liners

I've been making a lot of things with wool lately like these weavings and these crocheted hats which mean it's been a while since I made and shared a paper project. I made a couple of birthday cards earlier this week and was looking for a way to jazz up the plain envelopes. I decided to make my own diy envelope liners and thought I'd share them here as well.

Here's how I made them.

Materials needed to make Diy Envelope Liners

Supplies:

1. Lay your envelope flat and trace around it onto some card.

2. Cut out your envelope shape. Trim 3/4 inch off the bottom and a 1/4 inch off each side, this will ensure it fits easily into your envelope. You don't need to trim anything off the top.

3. Trace around your envelope liner template onto some decorative paper and cut it out. I like to use scrapbook paper but wallpaper would also work well.

4. Slide your liner into your envelope. Make sure to push the liner to the bottom of the envelope so it leaves the envelope glue clear. Fold the top of the envelope down including the liner and crease.

5. Open the envelope and glue the liner flap down using a glue stick or some double sided tape. Don't tape the bottom of the paper as it makes it harder to slide in.

6. To finish fold the envelope flap back down.

I love envelope liners. They're such a simple yet effective way to add personality to your cards or invitations and the best thing about them is they can be easily customised to fit any size envelope. Give it a go and let me know how you get on.

Diy Envelope Liners

Like this? You might want to check out my other envelope tutorials below.

Comment

Emma

Hi, I'm Emma.

I'm a crafter, blogger and paper enthusiast living in the North West of England.

Gathering Beauty is the place where I share craft tutorials and diy inspiration. I started this blog back in 2013 as a way of sharing all the things I love and make. I share paper crafts, clay crafts, origami, printables and desktop wallpapers as well as the odd crochet and weaving project. I hope you find something here that inspires you.